
Photo by Vishnu Mohanan on Unsplash
If you have some experience with Raspberry Pi, you know that Python is the most commonly used programming language for Raspberry Pi programming. However, when it comes to complex robotic projects, the need for a language with strong Object Oriented Programming support becomes more apparent. The weird syntax and the lack of types in python always makes me dislike it. That’s why I wanted to use Java or Kotlin for programming the Pi.
Pi4J is a Java library which provides an object oriented programming interface for Raspberry Pi. This library gives you the freedom to use Java or Kotlin for programming the Raspberry Pi.
Let’s see how you can get started with Pi4J:
Preparing your Raspberry Pi
Before getting started with programming, You’ll need to prepare your Raspberry Pi
- For this, you’ll need a Raspberry Pi that’s running Raspberry Pi OS.
- Then you need to change the Raspberry Pi configuration to enable I²C, Hardware Serial, One Wire and a few other things. For this you can use the
raspi-configterminal utility, or you can just use the following commands
sudo raspi-config nonint do_i2c 0
sudo raspi-config nonint do_ssh 0
sudo raspi-config nonint do_serial_hw 0
sudo raspi-config nonint do_serial_cons 1
sudo raspi-config nonint do_onewire 0
sudo systemctl disable hciuart
echo "dtoverlay=disable-bt" | sudo tee -a /boot/firmware/config.txt- Next you need to install Java and some other essential tools.
sudo apt install -y i2c-tools java-common libxi6 libxrender1 libxtst6- Use the following command to install Java 21 on your Raspberry Pi
wget https://cdn.azul.com/zulu/bin/zulu21.38.21-ca-jdk21.0.5-linux_arm64.deb
sudo dpkg -i zulu21.38.21-ca-jdk21.0.5-linux_arm64.deb
Now you are ready to get started with programming your Raspberry Pi
Writing your program
Writing your Java code can be done on a separate computer or inside the Raspberry Pi OS. I recommend you to use a separate computer for programming, as compiling a large Java/Kotlin code base will require a lot of resources, that a Raspberry Pi may not be able to provide.
For writing your program, I recommend you to use IntelliJ IDEA. Using that will simplify a lot of things.
First Open IDEA and create a new project. You can select either Java or Kotlin as your preferred language. I’m going to use Kotlin here as I prefer using Kotlin over Java. Make sure to use Maven as the build system.
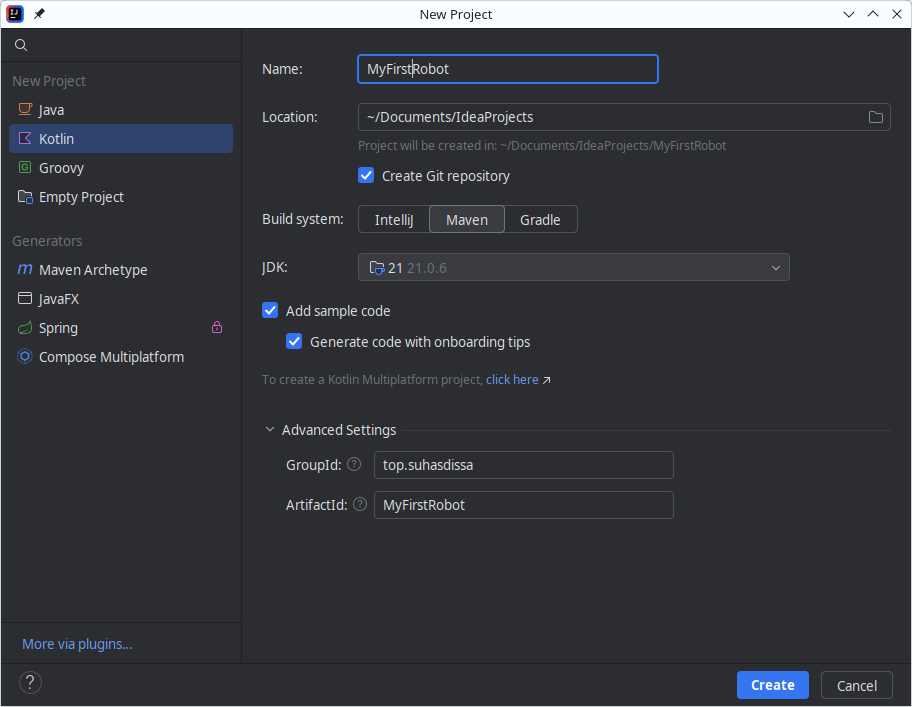
IntelliJ IDEA New Project window
Now it’s time to add the necessary plugins and dependencies to our project. Open pom.xml and add these lines under the plugins section. Make sure to replace the version numbers with the latest available versions.
<plugins>
    <!--
        https://maven.apache.org/plugins/maven-compiler-plugin/
        The Compiler Plugin is used to compile the sources of your project.
        -->
    <plugin>
        <groupId>org.apache.maven.plugins</groupId>
        <artifactId>maven-compiler-plugin</artifactId>
        <version>3.14.0</version>
        <configuration>
            <showDeprecation>true</showDeprecation>
            <showWarnings>true</showWarnings>
            <verbose>false</verbose>
        </configuration>
    </plugin>

    <!--
            https://maven.apache.org/plugins/maven-jar-plugin/
            This plugin provides the capability to build (executable) jars and is used here to set the
    mainClass
            which will start the application.
            -->
    <plugin>
        <groupId>org.apache.maven.plugins</groupId>
        <artifactId>maven-jar-plugin</artifactId>
        <version>3.4.2</version>
        <configuration>
            <archive>
                <manifest>
                    <mainClass>top.suhasdissa.MainKt</mainClass>
                </manifest>
            </archive>
        </configuration>
    </plugin>

    <!--
            https://maven.apache.org/plugins/maven-shade-plugin/
            This plugin provides the capability to package the artifact in an uber-jar, including its
    dependencies and
            to shade - i.e. rename - the packages of some of the dependencies. The transformer will combine the
    files
            in the META-INF.services directories of multiple Pi4J plugins with the same package name into one
    file.
            -->
    <plugin>
        <groupId>org.apache.maven.plugins</groupId>
        <artifactId>maven-shade-plugin</artifactId>
        <version>3.6.0</version>
        <configuration>
            <transformers>
                <transformer
                    implementation="org.apache.maven.plugins.shade.resource.ServicesResourceTransformer" />
            </transformers>
        </configuration>
        <executions>
            <execution>
                <phase>package</phase>
                <goals>
                    <goal>shade</goal>
                </goals>
            </execution>
        </executions>
    </plugin>
</plugins>
Then add these lines under the dependencies section. Make sure to replace the version numbers with the latest available versions.
<dependencies>
    <dependency>
        <groupId>com.pi4j</groupId>
        <artifactId>pi4j-ktx</artifactId>
        <version>2.4.0</version>
    </dependency>
    <dependency>
        <groupId>com.pi4j</groupId>
        <artifactId>pi4j-plugin-raspberrypi</artifactId>
        <version>2.6.1</version>
    </dependency>
    <dependency>
        <groupId>com.pi4j</groupId>
        <artifactId>pi4j-plugin-pigpio</artifactId>
        <version>2.6.1</version>
    </dependency>
    <dependency>
        <groupId>com.pi4j</groupId>
        <artifactId>pi4j-ktx</artifactId>
        <version>2.4.0</version>
    </dependency>
    <dependency>
        <groupId>org.slf4j</groupId>
        <artifactId>slf4j-simple</artifactId>
        <version>2.0.13</version>
    </dependency>
</dependencies>
Here’s an example pom.xml file
<?xml version="1.0" encoding="UTF-8"?>
<project xmlns="http://maven.apache.org/POM/4.0.0"
         xmlns:xsi="http://www.w3.org/2001/XMLSchema-instance"
         xsi:schemaLocation="http://maven.apache.org/POM/4.0.0 http://maven.apache.org/xsd/maven-4.0.0.xsd">
    <modelVersion>4.0.0</modelVersion>

    <groupId>top.suhasdissa</groupId>
    <artifactId>MyFirstProject</artifactId>
    <version>1.0</version>

    <properties>
        <project.build.sourceEncoding>UTF-8</project.build.sourceEncoding>
        <kotlin.code.style>official</kotlin.code.style>
        <kotlin.compiler.jvmTarget>1.8</kotlin.compiler.jvmTarget>
    </properties>

    <repositories>
        <repository>
            <id>mavenCentral</id>
            <url>https://repo1.maven.org/maven2/</url>
        </repository>
    </repositories>

    <build>
        <sourceDirectory>src/main/kotlin</sourceDirectory>
        <testSourceDirectory>src/test/kotlin</testSourceDirectory>
        <finalName>robot</finalName>
        <plugins>
            <plugin>
                <groupId>org.jetbrains.kotlin</groupId>
                <artifactId>kotlin-maven-plugin</artifactId>
                <version>2.0.21</version>
                <executions>
                    <execution>
                        <id>compile</id>
                        <phase>compile</phase>
                        <goals>
                            <goal>compile</goal>
                        </goals>
                    </execution>
                    <execution>
                        <id>test-compile</id>
                        <phase>test-compile</phase>
                        <goals>
                            <goal>test-compile</goal>
                        </goals>
                    </execution>
                </executions>
            </plugin>
            <plugin>
                <artifactId>maven-surefire-plugin</artifactId>
                <version>2.22.2</version>
            </plugin>
            <plugin>
                <artifactId>maven-failsafe-plugin</artifactId>
                <version>2.22.2</version>
            </plugin>
            <plugin>
                <groupId>org.codehaus.mojo</groupId>
                <artifactId>exec-maven-plugin</artifactId>
                <version>1.6.0</version>
                <configuration>
                    <mainClass>MainKt</mainClass>
                </configuration>
            </plugin>
            <!--
        https://maven.apache.org/plugins/maven-compiler-plugin/
        The Compiler Plugin is used to compile the sources of your project.
        -->
            <plugin>
                <groupId>org.apache.maven.plugins</groupId>
                <artifactId>maven-compiler-plugin</artifactId>
                <version>3.14.0</version>
                <configuration>
                    <showDeprecation>true</showDeprecation>
                    <showWarnings>true</showWarnings>
                    <verbose>false</verbose>
                </configuration>
            </plugin>

            <!--
            https://maven.apache.org/plugins/maven-jar-plugin/
            This plugin provides the capability to build (executable) jars and is used here to set the mainClass
            which will start the application.
            -->
            <plugin>
                <groupId>org.apache.maven.plugins</groupId>
                <artifactId>maven-jar-plugin</artifactId>
                <version>3.4.2</version>
                <configuration>
                    <archive>
                        <manifest>
                            <mainClass>top.suhasdissa.MainKt</mainClass>
                        </manifest>
                    </archive>
                </configuration>
            </plugin>

            <!--
            https://maven.apache.org/plugins/maven-shade-plugin/
            This plugin provides the capability to package the artifact in an uber-jar, including its dependencies and
            to shade - i.e. rename - the packages of some of the dependencies. The transformer will combine the files
            in the META-INF.services directories of multiple Pi4J plugins with the same package name into one file.
            -->
            <plugin>
                <groupId>org.apache.maven.plugins</groupId>
                <artifactId>maven-shade-plugin</artifactId>
                <version>3.6.0</version>
                <configuration>
                    <transformers>
                        <transformer
                                implementation="org.apache.maven.plugins.shade.resource.ServicesResourceTransformer"/>
                    </transformers>
                </configuration>
                <executions>
                    <execution>
                        <phase>package</phase>
                        <goals>
                            <goal>shade</goal>
                        </goals>
                    </execution>
                </executions>
            </plugin>
        </plugins>
    </build>

    <dependencies>
        <dependency>
            <groupId>org.jetbrains.kotlin</groupId>
            <artifactId>kotlin-test-junit5</artifactId>
            <version>2.0.21</version>
            <scope>test</scope>
        </dependency>
        <dependency>
            <groupId>org.junit.jupiter</groupId>
            <artifactId>junit-jupiter</artifactId>
            <version>5.10.0</version>
            <scope>test</scope>
        </dependency>
        <dependency>
            <groupId>org.jetbrains.kotlin</groupId>
            <artifactId>kotlin-stdlib</artifactId>
            <version>2.0.21</version>
        </dependency>
        <dependency>
            <groupId>com.pi4j</groupId>
            <artifactId>pi4j-core</artifactId>
            <version>2.6.1</version>
        </dependency>
        <dependency>
            <groupId>com.pi4j</groupId>
            <artifactId>pi4j-ktx</artifactId>
            <version>2.4.0</version>
        </dependency>
        <dependency>
            <groupId>com.pi4j</groupId>
            <artifactId>pi4j-plugin-raspberrypi</artifactId>
            <version>2.6.1</version>
        </dependency>
        <dependency>
            <groupId>com.pi4j</groupId>
            <artifactId>pi4j-plugin-pigpio</artifactId>
            <version>2.6.1</version>
        </dependency>
        <dependency>
            <groupId>com.pi4j</groupId>
            <artifactId>pi4j-ktx</artifactId>
            <version>2.4.0</version>
        </dependency>
        <dependency>
            <groupId>org.slf4j</groupId>
            <artifactId>slf4j-simple</artifactId>
            <version>2.0.13</version>
        </dependency>
    </dependencies>

</project>
Now let’s write a simple program to blink an LED
Let’s start by connecting an LED to our Raspberry Pi. Connect the LED cathode to GND pin and anode to pin 22.
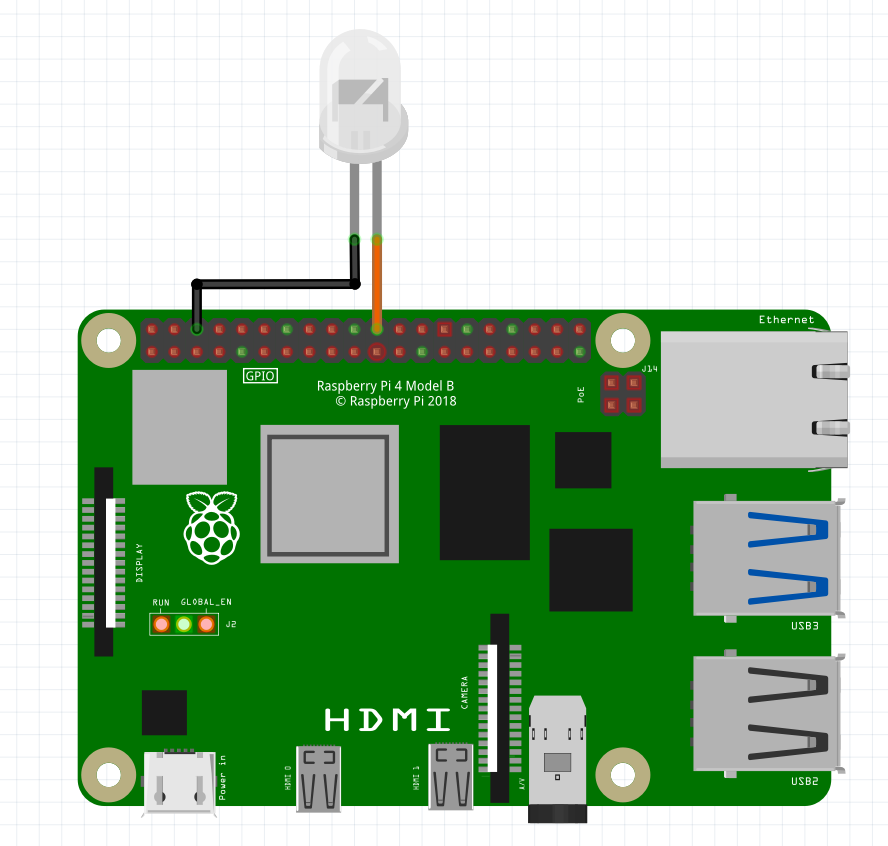
LED wiring diagram
Pi4J uses the BCM pin numbering scheme, which is different from the physical pin number. Use this diagram to get the BCM pin number for a given physical pin.
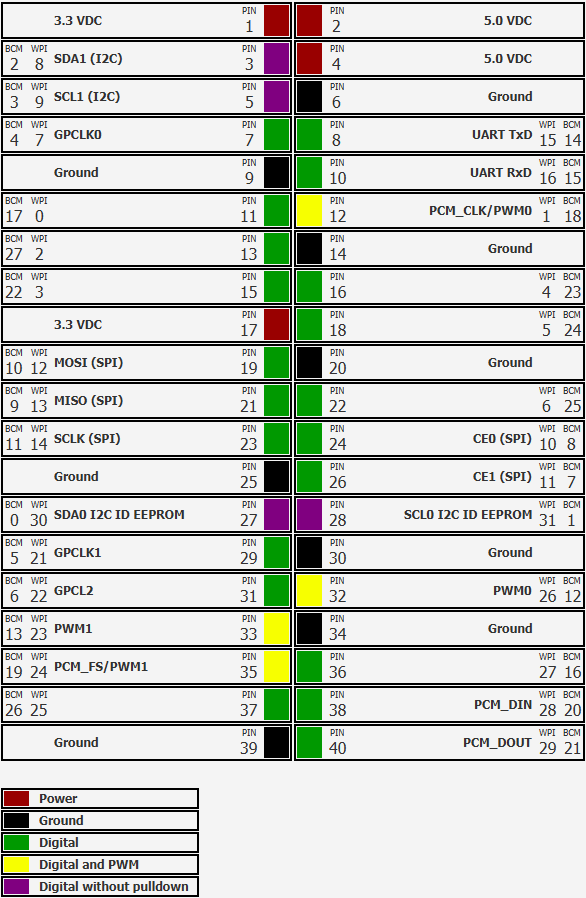
BCM numbering diagram for RaspberryPi pins
Let’s now write the code to blink an LED. Open the Main.kt and write the code like this
import com.pi4j.Pi4J
import com.pi4j.context.Context
import com.pi4j.io.gpio.digital.DigitalOutput
import com.pi4j.plugin.pigpio.provider.gpio.digital.PiGpioDigitalOutputProvider

fun main() {
    // Create a context for Pi4J
    val pi4j: Context = Pi4J.newAutoContext()
    // Define pin 22 (BCM 25) as led pin and make it an output.
    val led: DigitalOutput = pi4j.dout<PiGpioDigitalOutputProvider>().create(25 /* PIN 22 */)
}
Now we have defined our LED pin. It’s time to make our LED blink. Add these lines to make the LED blink.
I have crated a list of millisecond time duration values to blink the LED. It stays on for odd duration values and stays off for even duration values.
import com.pi4j.Pi4J
import com.pi4j.context.Context
import com.pi4j.io.gpio.digital.DigitalOutput
import com.pi4j.plugin.pigpio.provider.gpio.digital.PiGpioDigitalOutputProvider

fun main() {
    val pi4j: Context = Pi4J.newAutoContext()

    val led: DigitalOutput = pi4j.dout<PiGpioDigitalOutputProvider>().create(25 /* PIN 22 */)

    // Create a list of millisecond durations for the LED to be on and off
    val pattern = arrayListOf(
        0,
        150,
        150,
        150,
        150,
        75,
        75,
        150,
        150,
        150,
        150,
        450
    )

    // iterate over the pattern list and turn the LED on and off
    for (i in pattern.indices step 2) {
        led.high()
        Thread.sleep(pattern[i].toLong()) // ON time

        if (i + 1 < pattern.size) {
            led.low()
            Thread.sleep(pattern[i + 1].toLong()) // OFF time
        }
    }
    // turn off the LED after the pattern is done to ensure it is off
    led.low()
}
TIP: Try connecting a buzzer in place of the LED to hear this nice pattern.
Compiling the code
Now open the project’s folder in a terminal and run mvn clean package. This should create a .jar file inside the target directory.
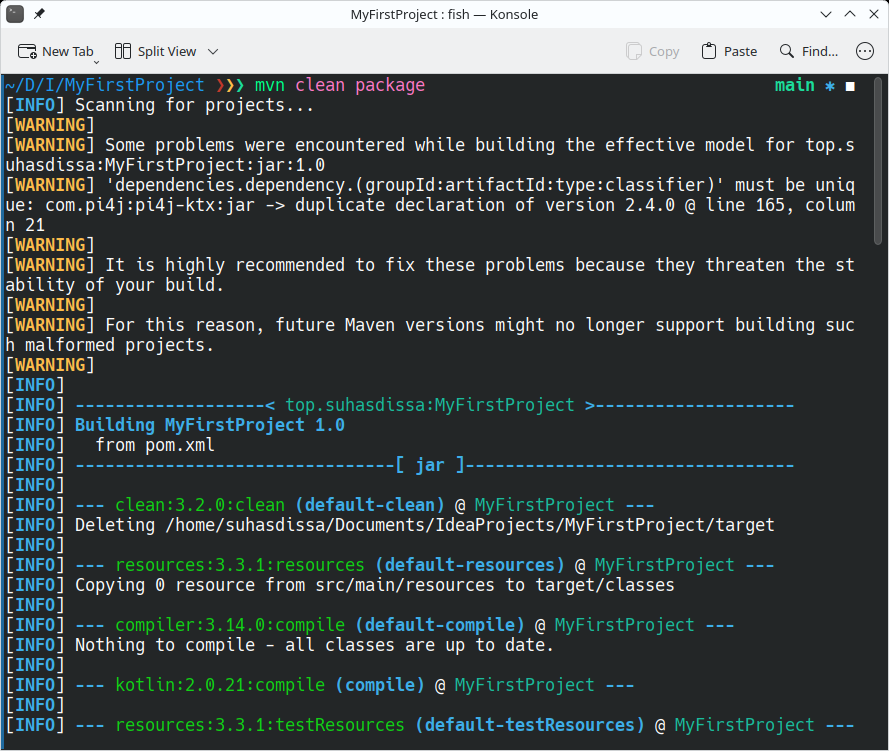
Compiling the package
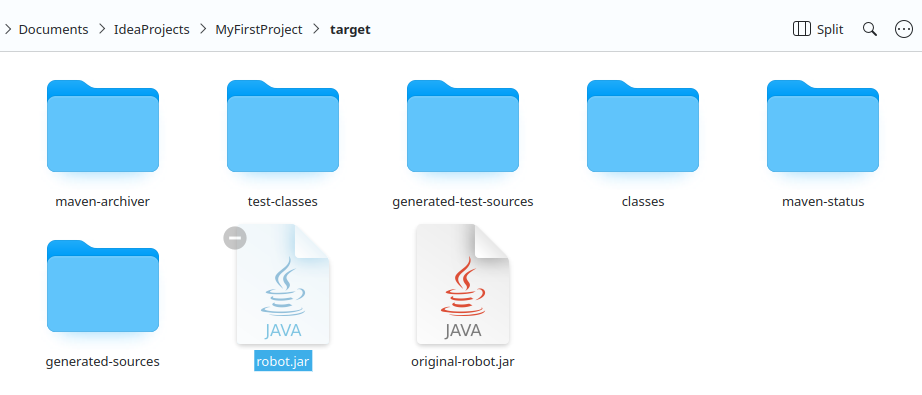
You can find the compiled jar file inside the target directory
For the mvn command to work, you need to have maven installed in your system. Follow this guide to learn how to install mvn on your system.
Running the code on a Raspberry Pi
Now it’s time to run the generated jar file on our Raspberry Pi. But before running it, we need to upload the file onto our Raspberry Pi. For this we’ll be using sftp
Turn on the Raspberry Pi and connect it to your local network. You can use WiFi or Ethernet for this. You have to know the local IP address of the Raspberry Pi. (You can use your router’s admin page or use nmap to find this)
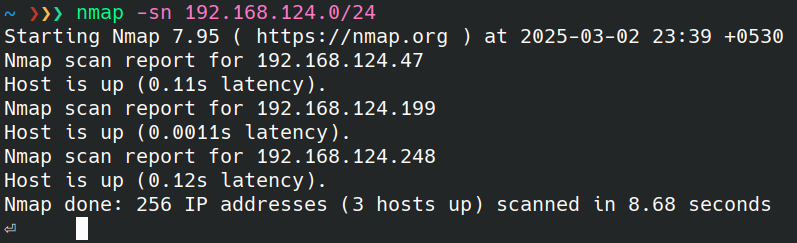
Using nmap to scan the local network
Use the sftp command to upload the jar file to Raspberry Pi. For me, Raspberry Pi is using 192.168.124.248
sftp [email protected]

sftp> put /home/suhasdissa/Documents/IdeaProjects/MyFirstProject/target/robot.jar
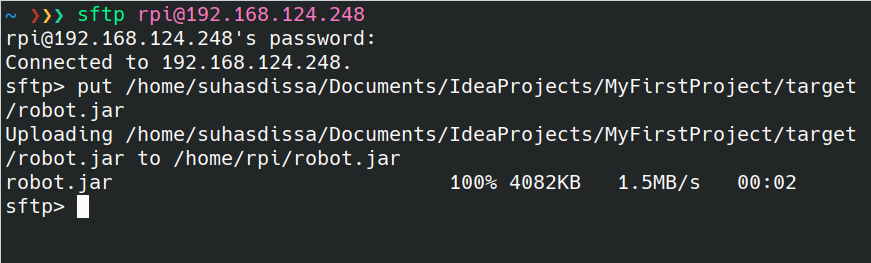
Now the jar file is uploaded to the Raspberry Pi’s /home/rpi directory. Here, rpi is the username of the Raspberry Pi’s user account.
Now we can use ssh to log into our Pi and run the jar file
ssh [email protected]sudo java -jar robot.jar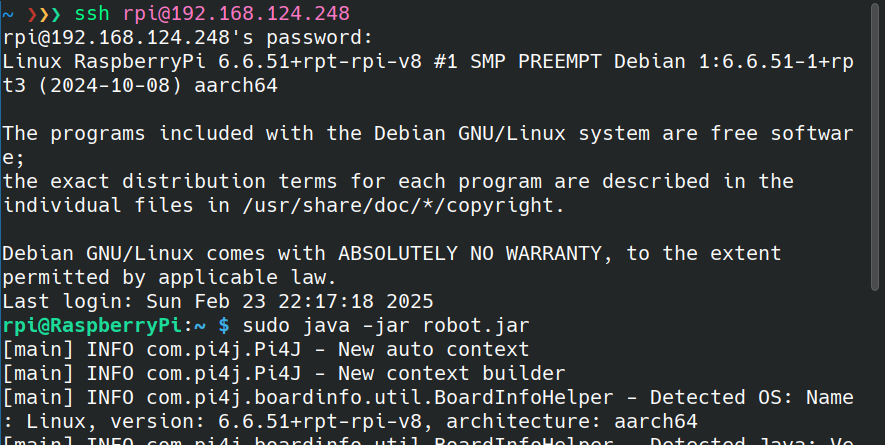
Now you should see your LED blinking!
I hope this guide helped you to get an idea about Raspberry Pi and Pi4J.
I’ll meet you again with my next article.